My old professor always said "if anyone ever asks you an engineering question, the first two words out of your mouth should always be 'it depends'. Not only because that is almost always true, but also because it gives you time to think of the real answer".
The coffee and milk problem
There is a popular heat transfer question which goes something like this:
Suppose you brew yourself a cup of coffee that you want to drink with milk. If your goal is to cool the drink down to the perfect drinking temperature as soon as possible, at which point do you add the milk to the coffee: immediately, or later?
Sometimes details are changed (coffee or milk are replaced with tea or cream, or the objective is flipped into keeping the beverage hot for the longest time instead of cooling it down quickly), but the general idea stays the same. There are many resources online that give the "easy" answer to this question: The amount of heat exchanged between two bodies (in this case: the hot liquid and the surrounding room) is proportional to the temperature difference ("delta T" or "ΔT") between them. Therefore, if your goal is to cool the system down as quickly as possible, you want to keep the coffee as hot as possible for as long as possible to maximize the heat exchange, and so you wait as long as you can before you pour in the milk. This result is generally agreed upon - though with sometimes wildly different reasoning (see the appendix for some sources).
When I first heard of the question as a teenager, I had never heard this explanation and, of course, had no idea which way is better. Later, during my early engineering classes, I learned about the laws of heat transfer and finally understood the answer given above. But when I heard it again for the third time recently, my old professor's words rang in my ears. Was the answer actually 'it depends'? Generally speaking, I knew the explanation was still true for any reasonable assumptions. But what if we are not reasonable?
For example, who said that the milk stays in the fridge until it is mixed with the coffee? Doesn't that defeat some of the purpose of the question? What if instead it stood next to the coffee to make it a fair comparison? Couldn't it heat up quicker than the coffee cools down? For example, what if the coffee cup is insulated and the milk cup isn't? What if the milk cup has a way higher surface area than the coffee cup, for example if it is very slim or very wide? What if the ambient temperature is not "Finnish winter" but "Italian summer"? Also, doesn't the addition of milk increase the overall contact area of the hot liquid with the cold cup wall and couldn't it therefore speed up the heat transfer? What if the cups were not cylinders but v-shaped, and adding milk greatly increased the exposed surface area of the two liquids? My gut feeling now told me that the answer to these questions was a resounding "I don't know".
Well, as my great-grandmother always used to say: if you are unsure about something in your life, do a numerical simulation. And since I haven't solved any heat transfer problems in years, I set out to do just that.
Warning: This gets a bit detailed and nerdy. If you just want to skip right to the results, you can click HERE.
How heat is transferred
Before we get into the problem itself, we need to quickly define how a hot body (in this case the coffee) can lose heat to its surroundings. Generally, there are four main mechanisms at play here:
- Radiation: Hot things radiate out energy into their surroundings. Both the cup walls as well as the hot surface of the liquid lose energy due to radiation. When taken to extreme temperatures, you can even see this radiation with your eyes, for example when metals glow hot in furnaces. Radiation is why you can feel the heat from bonfires from a few feet away even when the air around you is cold.
- Conduction: When two bodies of different temperature touch, heat flows from one to the other. By touching the cup's walls, the hot liquid transfers energy to it. Similarly, there is conduction within the wall itself, for example from its inner faces to its outer faces. The outer wall and the liquid surface are also in contact with the surrounding air, through which additional heat is transferred. This type of heat transfer is increased by the presence of moving fluids, which is called...
- Convection: When gases or liquids move (for example due to wind or buoyancy differences), their molecules physically carry away some of the heat with them. This increases the heat transfer at the boundary between two bodies. This is why cold air feels way colder when the wind blows, even more so if you spray some water on yourself, because of...
- Evaporation: A liquid molecule requires energy to evaporate (and quite a lot of it). It gets this energy from its surrounding, cooling it down in the process. This is how sweating works. Our hot coffee surface is permanently losing some molecules to the air due to evaporation, which you can see in the classic vapor streaks that form on top of it.
These four mechanisms govern almost all of the heat transfer in our coffee scenario (unless you expect things like radioactive decay or significant non-isothermal chemical reactions, in which case I suggest you do not drink that coffee). Since all of these scale with the available surface area, it is also important to define exactly which parts of the system are exposed to any of the other parts. For this, I drew a small diagram.
Let's paint a picture
Defining the shape of the bodies that we want to calculate can be as important or even more important than the way we solve the problem. In numerical calculations, the way a system is divided into smaller chunks is called discretization. The following figure shows three different ways of discretizing our coffee setup spatially.
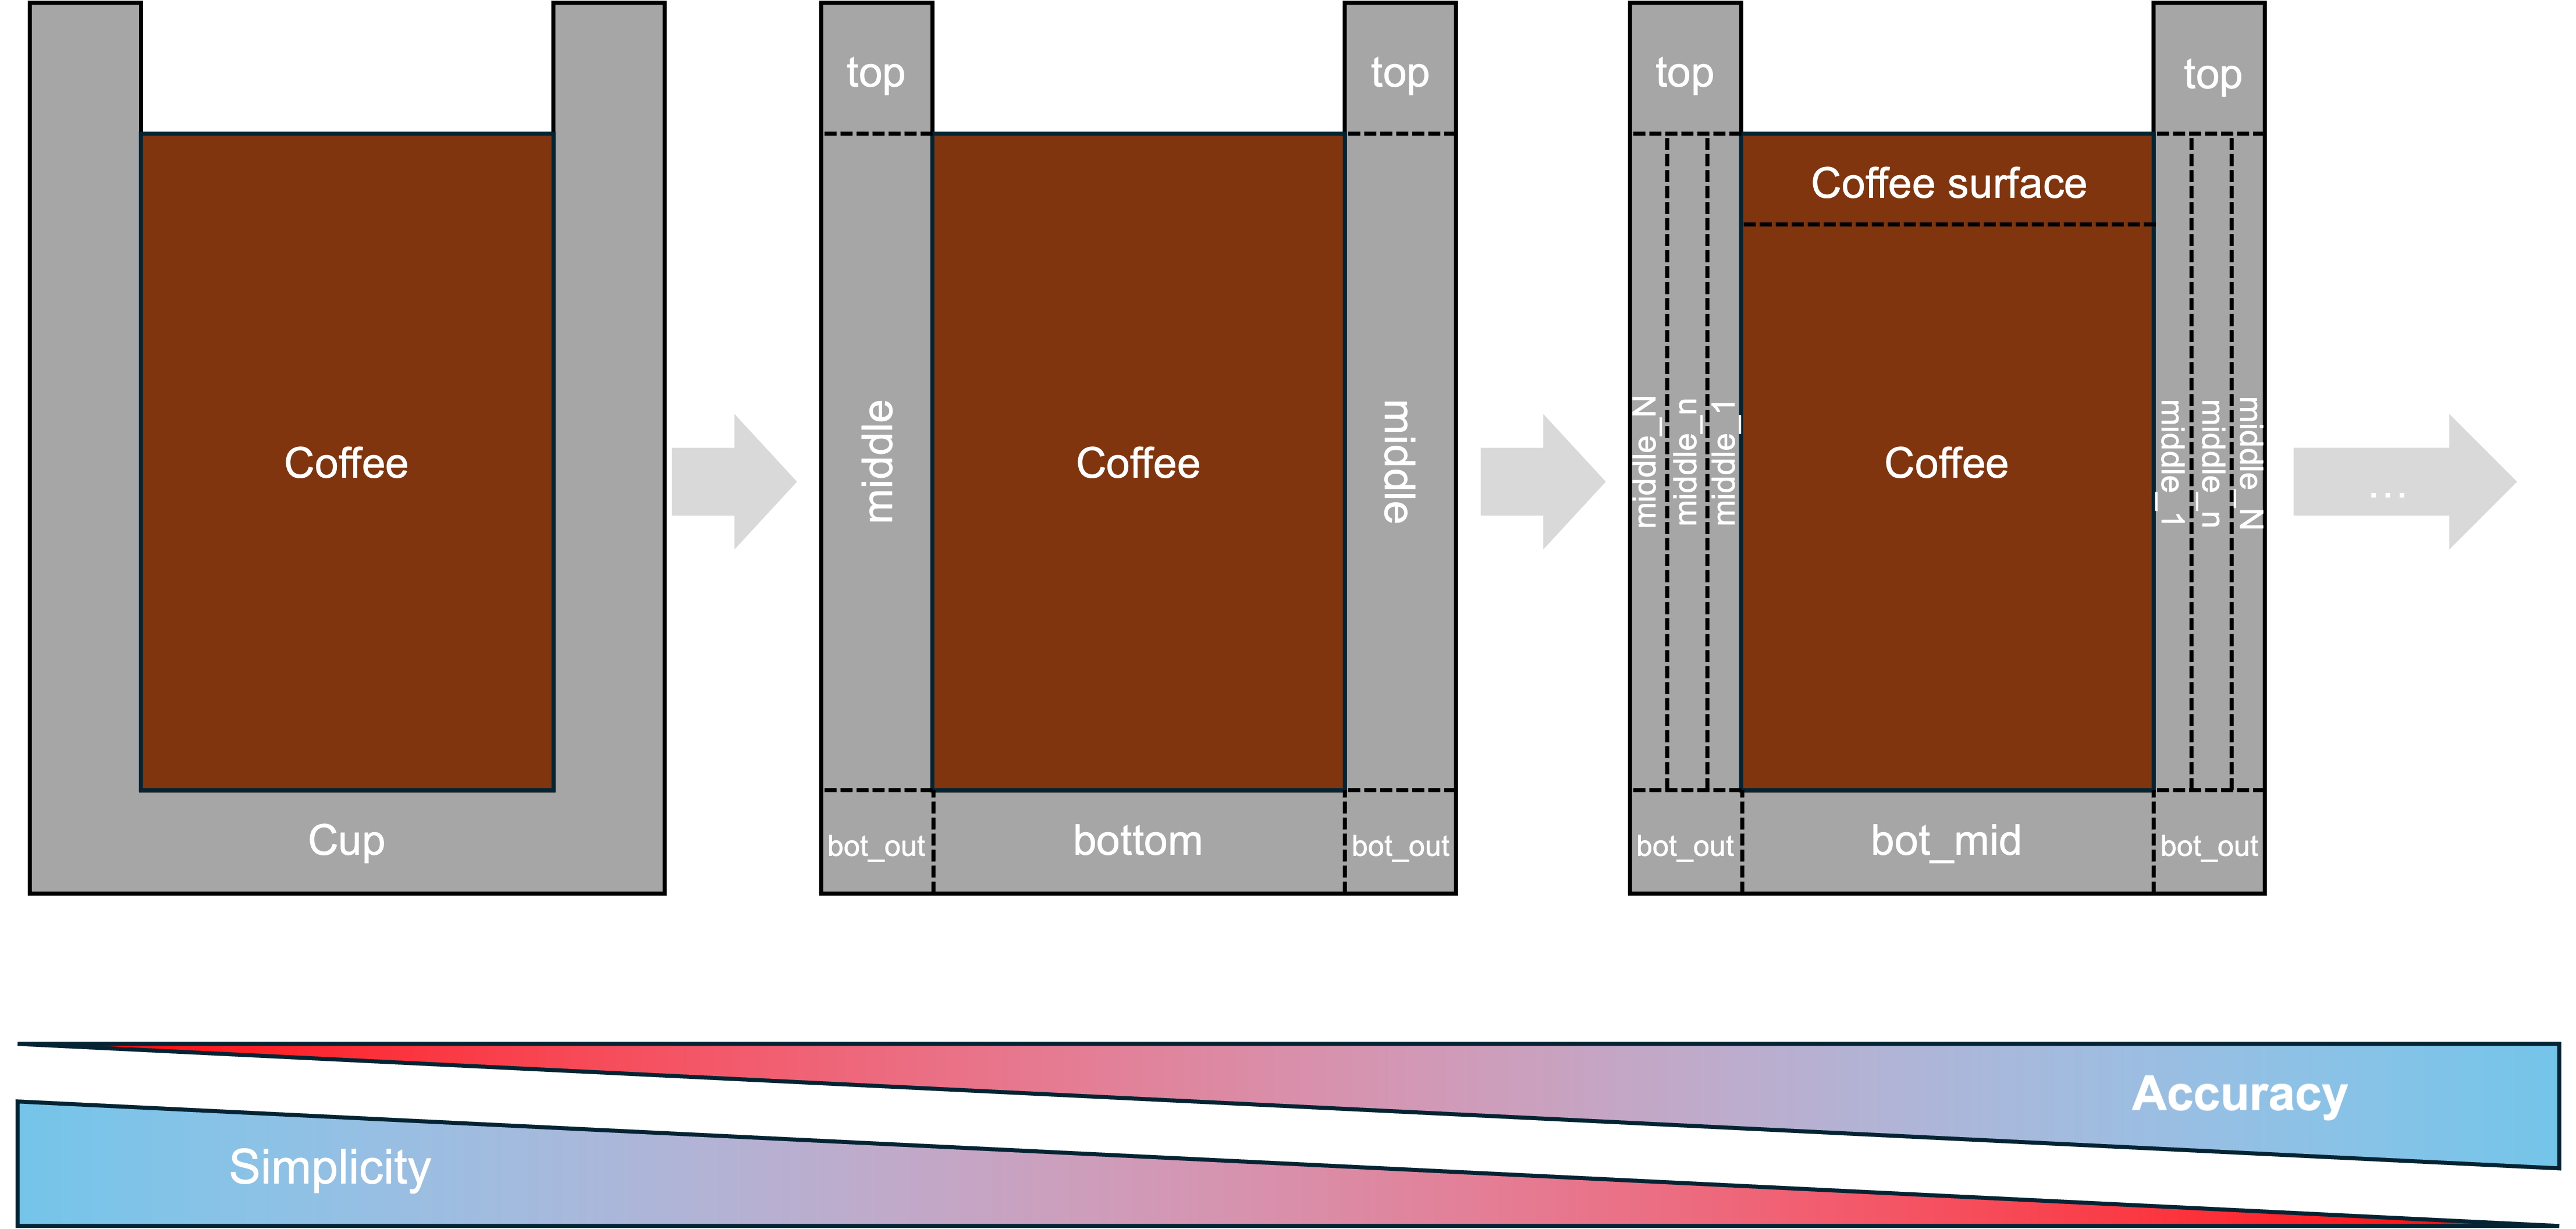
The simplest (though maybe not most accurate) way on the left defines a three-part system (ambient air, coffee, cup). On the other end of the spectrum, we split up each body into multiple nodes, each of which is later calculated individually. If we continue this trend, we end up with full computational fluid dynamics (CFD) simulations that can determine even small-scale phenomena like local temperature gradients in the cup and turbulent mixing in the liquids. I did not want to go there, so I chose the rightmost step in the figure above. This way, I could include the effect of the fill level of the liquid, temperature gradients in the cup for very thick walls, and a slight cooling of the liquid surface compared to the bulk liquid due to evaporative cooling, while still not needing a full CFD setup. It should be noted that I did assume we still use cylindrical cups, so no v-shapes for now.
With this, I could move on to finding the right equations that needed to be solved at each of the interfaces. I updated the figure above to include an arrow for each equation at each interface:
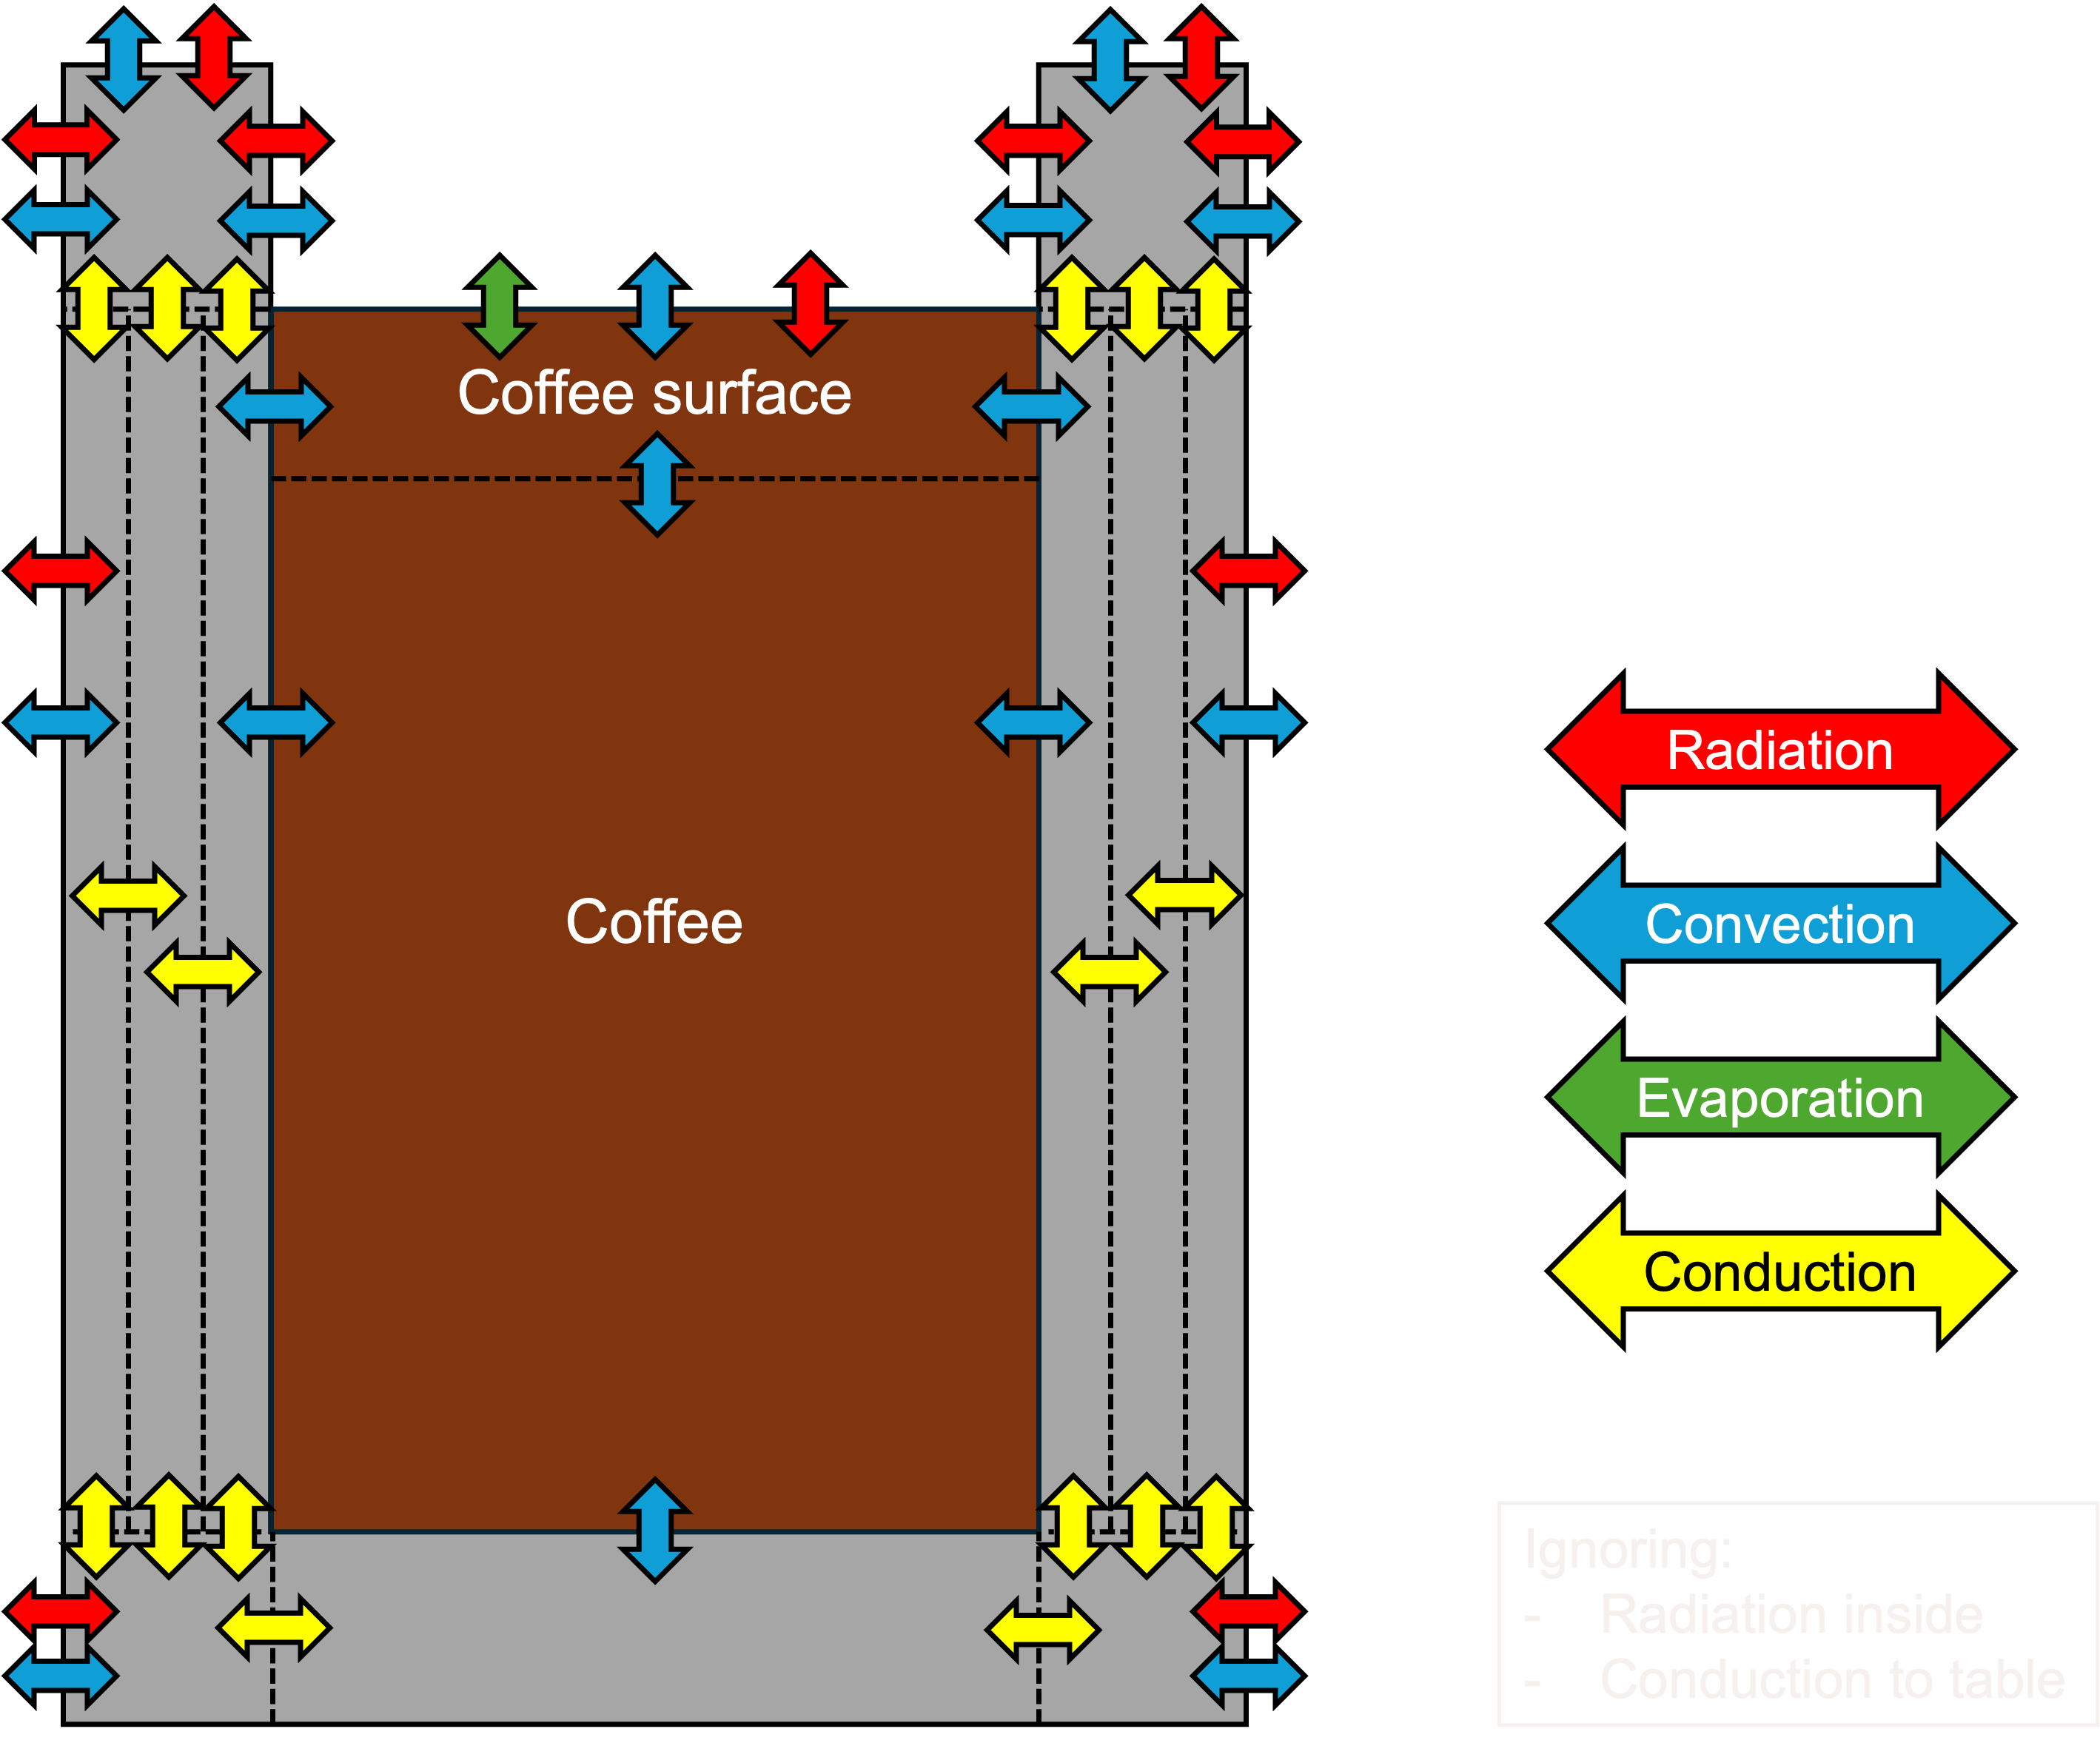
As you can see, I assumed that the bottom of the cup is isolated against the table and that there is no internal heat exchange via radiation between the liquid and the inner walls. Other than that, there are quite a few equations to solve. The next step then is to find out what those equations actually look like.
Translating it into equations
Let's get even nerdier. The general equations for each of the four types of heat transfer are well-known and they all follow a similar structure. For each, the total amount of heat transferred per time (dQ/dt) is calculated by some gradient (temperature or vapour concentration), a scaling factor depending on the materials and setup (σ, ε, hT, k, hm, ΔHlv), and the relevant surface area (A). In detail, this is what they look like:
- Radiation:
dQ/dt = σ * A * ε * (T1^4 - T2^4) - Conduction:
dQ/dt = k * A * (T1 - T2) - Convection:
dQ/dt = hT * A * (T1 - T2) - Evaporation:
dQ/dt = ΔHlv * hm * A * (c1 - c2)
The indices 1 and 2 denote the two temperatures (T) or vapor concentrations (c) at each node. For radiation and conduction, the scaling parameters are simple material constants which can be found online. The convective thermal and mass transfer coefficients hT and hm, however, depend on the flow patterns at the area of interest. Bluntly said, blowing on a hot thing cools it down more quickly. But even if there is no forced convection (since we don't blow on our coffee in this experiment), natural convection still occurs: temperature differences of the air near the wall lead to a change in air density and therefore a natural convective movement (think of the shimmering air above hot roads in the summer). On the top liquid surface, the same thing happens. There, this phenomenon is augmented by the evaporation of water vapor, which is of lower density than air, leading to additional movement. The more water vapor is removed by this, the more additional evaporation can occur, and the faster the cup cools down[1].
If you wanted to describe these phenomena in detail, CFD simulations are inevitable. However, engineers have long found more simple correlations to describe their global effects without needing to describe them locally by using so-called dimensionless numbers. While those are slightly annoying to calculate in some parts[2], they offer good approximations for a reasonable effort compared to the real deal.
When it comes to radiation, another interesting effect is that the surface does not radiate out its entire energy into the environment if the cup is not completely filled. Some of what the liquid surface "sees" is the inner sides of the top walls, so it is also radiating towards that (and vice versa). This effect is stronger when the liquid level is low and the cup is narrow. The resulting radiation equations therefore have a view factor included in them that you can find in the provided code.
With heat transfer out of the way, one last step is still missing: If my coffee loses a certain amount of heat, how does that affect its temperature? To answer that, one last equation has to be introduced, which translates a body's total transferred heat into a temperature difference via its material's heat capacity coefficient cp:
dQ = m * cp * (T1 - T2)
With this, the final hurdle is turning all of this into a code that runs.
The code
When it came to the code, I decided to keep it as simple as possible. To solve all equations at each time step, I went with an explicit Euler formulation, which can become unstable under some extreme conditions but is far easier to program compared to implicit solvers and is easily good enough for this use case. To make sure I did not violate the laws of physics (again), I calculated the total energy of each system at each time step and made sure it all added up (I recommend you always do this. It has saved me from countless missed terms and flipped signs somewhere in my code).
I used 5 wall slices for the internal wall temperature, paying attention to the fact that each slice has a different mass and surface area on the inside and outside compared to its neighbors due to the cylindrical cup shape. At a time step of 0.1 seconds and a final time of 18 minutes, this setup runs in less than a second on an everyday laptop. At each time step, I calculated how each block in my simulation exchanges heat with each neighboring block and subsequently changes temperature. Rinse, repeat, and you have yourself a simulation. Now comes the fun part: do the results make any sense?
Testing
Of course, any good tinkerer has a few thermocouples and an Arduino laying around somewhere with which they can measure the temperature profile of their morning cup of tea. Well... I'm not one of those. But if engineers can say that π ≈ 3 with a straight face, I surely could do a first rough calculation based on feels, right?
I brewed myself a cup of tea (exactly 100 °C at boiling) and poured it into one of the mugs I had lying around, with no milk added yet. While it cooled, I measured/estimated some of the boundary conditions and set some ground rules:
- Diameter of the mug: 7 cm
- Thickness of the wall: 7 mm
- Fill level of the cup: 70 %
- Amount of liquid: 300 ml
- Ambient temperature: 20 °C
- Cup temperature: 20 °C
- Ambient humidity: 50 %
- 2 % of the liquid is lumped into the "surface" node.
- The properties of air and water were calculated from several equations at their respective temperature
- Other properties of the cup were assumed to be equal to those of porcelain (which I guessed it is made of)
- The tea does not lose any significant mass during evaporation
I had no idea at what temperature I usually drink my tea, so I looked online for resources. One meta-study found that preferred drinking temperatures ranged from 58 °C to 71 °C, so I guessed that I'm also drinking mine somewhere in the mid-60s °C. I started a stopwatch and waited until it felt like my tea was at the optimal temperature: 15 minutes was still too hot, 17-18 minutes was perfect. Then I ran the code and looked at the results:
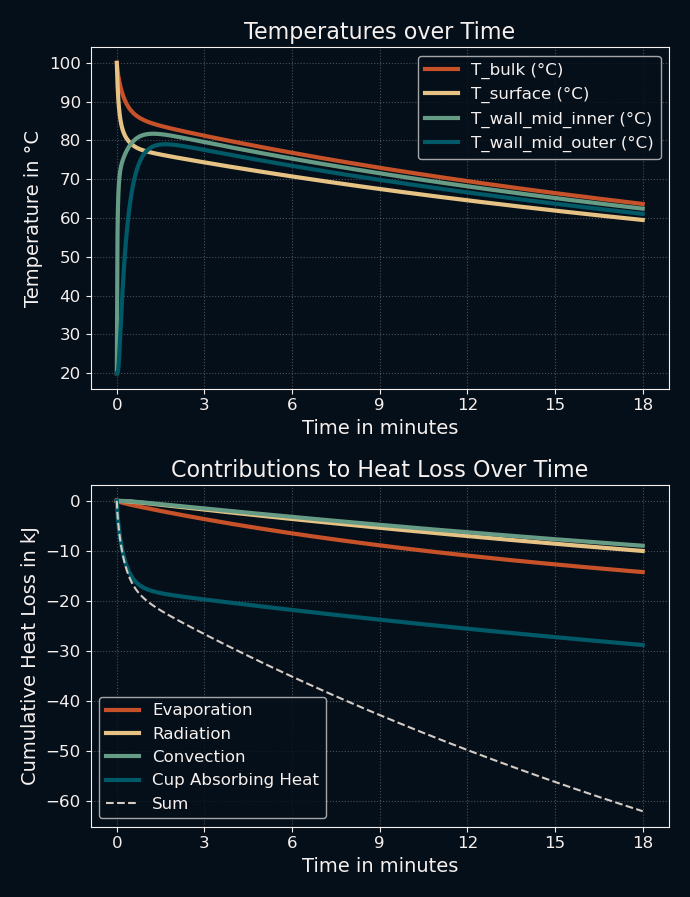
This was honestly much closer than I expected. The simulation shows a liquid temperature of approximately 64 °C after 17 minutes. Note that this is all based on geometry and guessed material constants. My code wasn't going to win any beauty contests, but it seemed to work. My biggest surprise was something that I did not read about in any other discussion of this riddle: If you look at the bottom graph, the main contributor to the initial cooling of the coffee is the cup itself! By simply absorbing most of the heat and slowly dissipating it to the environment, its thermal mass contributes more than the other effects combined. This means that you could cool down your beverage far more quickly if you simply poured it into a different cup after a couple of minutes.
Now, does it still work when I use a cold beverage instead? Let's try pouring 50 ml of milk at 4 °C into a 5 cm diameter porcelain cup that is at room temperature, filling it to 50 % in the process:
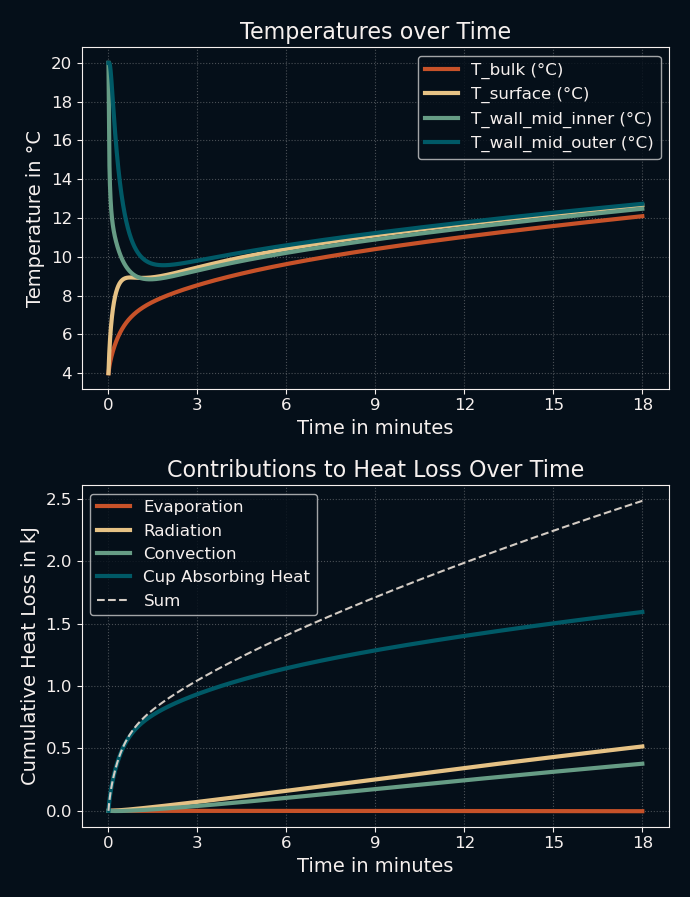
Seems fine to me. Again, I can't verify the numbers yet, but the code works. This means we can progress to the actual problem: mixing the two liquids. For that, we can just use the current code and modify it a bit:
- Start with two cups at room temperature
- At t=0, fill one cup with the hot beverage, the other with the cold one
- Run the simulation for both coffee and milk until the mixing time t is reached
- Calculate the temperature of the two liquids after mixing [via
(m1 * T1 + m2 * T2) / (m1 + m2)] - Calculate the new fill level of the liquid
- Since the milk is poured into the coffee cup, keep the wall temperatures of the coffee cup as the starting point for the new simulation[3]
- Run the simulation with the new starting values for the remaining time
For the first test, I used the same values as before, but mixed the liquids immediately, after 7 minutes, and after 15 minutes to see the effect on the final temperature. Here are the results:
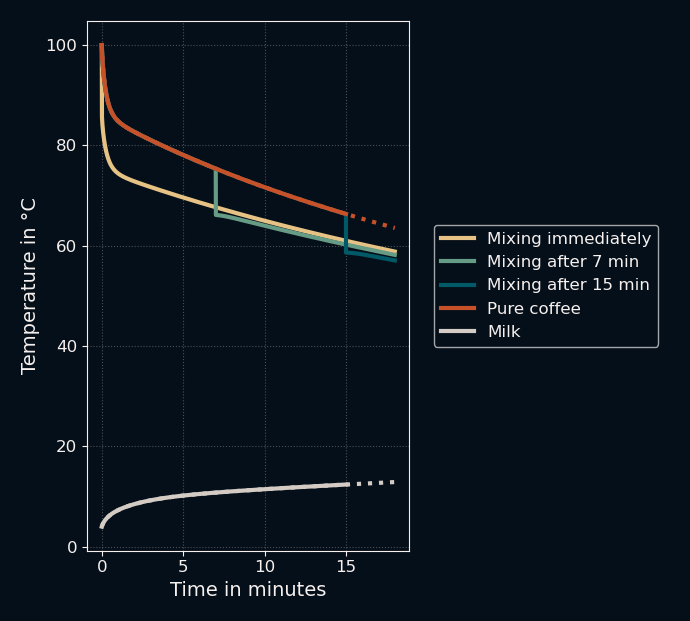
Here is the same image zoomed in on the top part to show the difference in final temperatures:
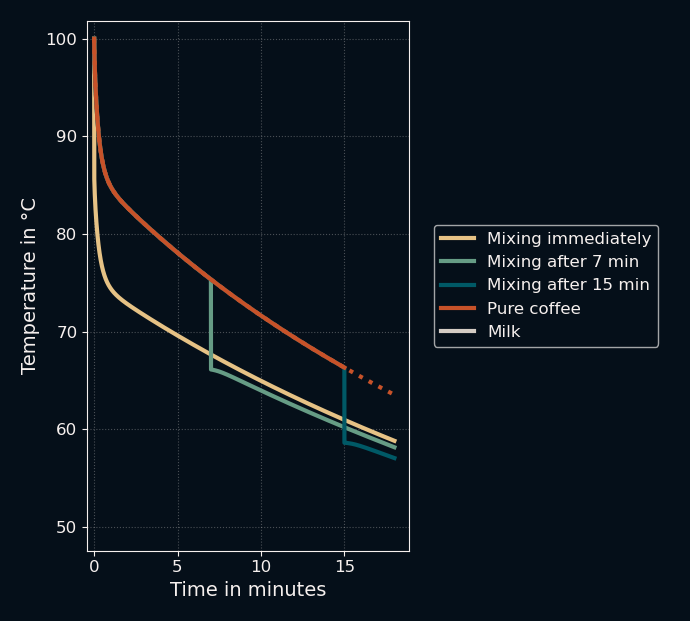
This confirmed the initial explanation: Mixing in the milk early leads to higher final temperatures. So far, so good. You can even see a fascinating effect that I did not expect before running the simulation: right after the milk is added, the temperature of the mixture rises again in a small "rebound". What I first thought was a bug in my code made sense after a second thought: just after the two liquids are mixed, the inner wall of the coffee cup is still approximately at the temperature of the bulk coffee while the mixture is below that. This leads to a short reverse flow of heat back into the liquid. Neat.
But, of course, this is not what we came for. We came for the reverse result: can I change the initial conditions so that it's better to mix the liquids early?
What is a "cup" anyway
To find out, let's see what happens if we increase the ambient temperature to 35 °C (a hot summer day) and store the milk in a flat, wide bowl-shaped "cup" with a diameter of 15 cm.
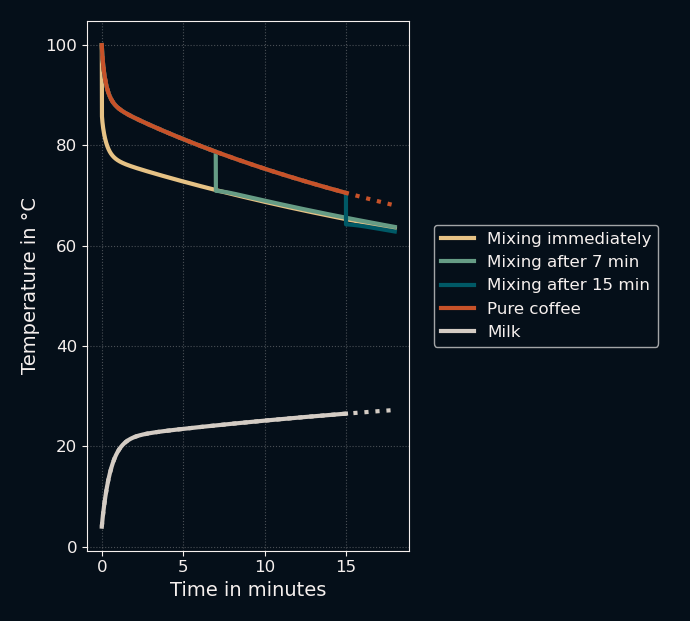
Let's zoom in again to see if it worked...
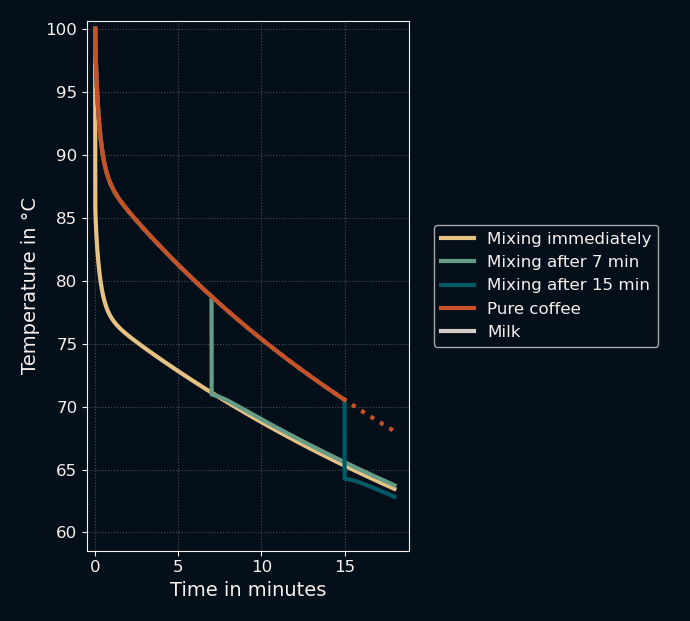
It did! Mixing immediately led to lower temperatures compared to mixing after 7 minutes, though it did lose again to waiting 15 minutes. This was... easier than expected?
So, why does this happen? In my opinion, there are two main things that work in favor of a quick mixing:
- The available contact area of the coffee with the cup increases due to a rising liquid level, leading to a possible increase heat transfer depending on the ratio of radii, thermal conductivities and system temperatures[4].
- As we noted earlier, a large chunk of the initial heat transfer in each cup comes from the thermal mass of the cup walls. When the cold milk first touches the (room temperature) cup, a large amount of heat is quickly transferred from the cup into the milk, heating the latter up. If you then pour the milk into the coffee later, the cold cup is discarded from our observed system, having provided practically "free heat" to our system that we did not want. Immediate mixing bypasses this issue.
Now, I can already hear some of you say "but this isn't how I store my milk! I store it in a cup inside the fridge, so the cup doesn't start at room temperature but at milk temperature! This is just cheating!". Well... okay, let's start from a refrigerated cup. This makes it a little harder to make the early-mixing-strategy win, since we only have the first point to work with. But we can still do it. The only thing we need to do is move to the desert and drink our coffee with a group of Bedouins at a cozy 50 °C and store our milk in a "cup" which looks a bit more like a very thin test tube made from a more conductive material. That way, the early mixing strategy still wins out (though just barely).
Listen, I said we are not here to be reasonable, okay?
Conclusions
I guess my professor was right. It does depend. More importantly, I learned a lot going through heat and mass transfer laws again and I found some things in the results that I did not expect. What I thought would be a single-afternoon project ended up taking me a few weekends. I could definitely have included even more things to flip the original answer around (like convex/concave or otherwise non-staight cups, 100% humidity or hyperbaric pressure to suppress evaporation, blowing wind on one cup, ...), but I had to stop somewhere.
What surprised me the most about this calculation was that the room temperature cup itself is the main contributor to cooling down the coffee quickly. It seems obvious in hindsight, but with most people arguing about the effects of radiation versus convection, the easiest answer seems to be "if you want to cool your coffee down quickly, use a heavier cup".
If you feel inspired to try out some things, feel free to modify my code, which I posted on Github. I also asked two friends to perform some measurements, so stay tuned for an update in a few weeks.
Appendix
As always, I read most of the following sources after doing my calculations. If I read them beforehand, I sometimes lose interest in doing the whole thing myself. Some sources also give (some of) the relevant equations, explaining the phenomenon either via Newton's law of cooling (such as [LINK] and [LINK]) or radiation effects (such as the brilliant Matt Parker), and some highlight the importance of evaporation as well (such as these CFD simulations from COMSOL). There are also experiments done on this which showcase the results (e.g. [LINK] and [LINK]).
Footnotes
[1] More interestingly, this effect is sometimes reversed, such as with dry ice, where the newly formed vapor does not rise up by itself and hinders further heat transfer.
[2] The most important number in this experiment is the Nusselt Number Nu. Think of it as a "multiplier for conduction". Nu tells you by how much your heat transfer is improved by convective forces compared to the normal conductive heat transfer. How do we find Nu? We describe the properties of the carrier medium with the Prandtl number Pr and the movement of the fluid by the Reynolds number Re (for forced convection) or the Rayleigh number Ra (for natural convection). Then, we look at hundreds of experiments done by engineers around the world that correlate these numbers to Nu. These correlations often look something like Nu = 0.332 * Re^(1/2) * Pr^(1/3), and are specific to each geometry and flow regime (turbulent, laminar). Long story short: there are a lot of simple equations that are only valid for specific real world setups but approximate the overall "multiplier for conduction" quite well. In the case of our natural convection due to mixed solutal buoyancy (concentration difference of water vapour) and thermal buoyancy (density difference of the air due to temperature), the Rayleigh number Ra includes terms for both effects. If you want more details, you can have a look at the comments I left in the code.
[3] It is very important to account for the new liquid level and the subsequent changes in wall segment heights. Since the mid section is now larger than before, it "inherits" some of the temperature of the colder top section that previously occupied this height. If you ignore this, you create or destroy energy, which is (generally speaking) a bad idea.
[4] The resulting analytical equation for this is too long for this post since it contains all of the equations that we solved numerically here. It would be fun to find the solution space for this problem though, so if you want to go for it, let me know! I think you can derive it from a piecewise solution of d(dQ/dt)/dV > 0 and finding dA/dV and the change in ΔT for different starting parameters.